
# MySQL 高级
# MySQL 的架构介绍
# MySQL 简介
概述
MySQL 是一个关系型数据库管理系统, 由瑞段 MySQL AB 公司开发, 目前属于 Oracle 公司
MySQL 是一种关联数据库管理系统, 将数据保存在不同的表中, 而不是将所有的数据放在一个大仓库中, 这样就增加了速度并且提高了灵活性
MySQL 是开源的
MySQL 支持大型的数据库, 可以处理拥有上千万条记录的大型数据库
MySQL 使用标准的 sql 数据语言形式
MySQL 可以运行在多个系统上, 并且支持多种语言, 这些编程语言包括 C, C++, Python, Java, Perl, PHP, Eiffel, Ruby 和 Tcl 等.
MySQL 支持大型数据库, 支持 5000w 记录的数据仓库, 32 为系统表文件最大支持 4 GB, 64 为系统最大支持的表文件为 8TB
MySQL 是可以定制了, 采用 GPL 协议, 你可以修改源码来开发自己的 MySQL 系统
高级 MySQL
- MySQL 内核
- sql 优化工程师
- MySQL 服务器的优化
- 查询语句的优化
- 主从复制
- 软硬件升级
- 容灾备份
- sql 编程
# yum 安装MySQL (可行)
# 安装 MySQL
下载并安装 MySQL 官方的 Yum Repository
wget -i -c http://dev.mysql.com/get/mysql57-community-release-el7-10.noarch.rpm
yum 安装 Yum Repository
yum -y install mysql57-community-release-el7-10.noarch.rpm
安装 MySQL 服务器
yum -y install mysql-community-server
以上三个指令, 最后出现 complete 即证明无错误
可以输入 mysql --version 进行检查

ps : 可能出现以下问题

解决方法 :
输入
rpm --import https://repo.mysql.com/RPM-GPG-KEY-mysql-2022
再输入
yum -y install mysql-community-server
2
3
4
# MySQL 数据库设置
MySQL 常用命令
# 启动 MySQL
systemctl start mysqld.service

# 重启 MySQL
systemctl restart mysqld.service

# 停止 MySQL
systemctl stop mysqld.service

# 查看 MySQL 运行状态
systemctl status mysqld.service

# 进入数据库
mysql -uroot -p
2
3
4
5
6
7
8
9
10
11
12
13
14
启动 MySQL 服务器
systemctl start mysqld.service1只要不出任何消息就没问题
查看 MySQL 数据库状态
systemctl status mysqld.service1
查看 root 密码
grep "password" /var/log/mysqld.log1
进入数据库
mysql -uroot -p1再输入密码, 进入会话中

修改密码
ALTER USER 'root'@'localhost' IDENTIFIED BY 'new password';
ALTER USER 'root'@'localhost' IDENTIFIED BY 'W6YnvKnLzpSFNGuc.';
1
2
3新密码必须包含 大小写字母数字和特殊符号(,/';:等)
开启 MySQL 的全程访问
grant all privileges on *.* to 'root'@'%' identified by 'password' with grant option;
grant all privileges on *.* to 'root'@'%' identified by 'W6YnvKnLzpSFNGuc.' with grant option;
1
2密码必须包含 大小写字母数字和特殊符号(,/';:等) 若指向指定的ip地址才能访问 MySQL, 可以将
'root'@'%'修改为'root'@'192.168.0.1'最后刷新退出
flush privileges;
exit
1
2修改 mysql 默认端口号 (可选, 若搭建在服务器上, 则推荐)
vim 打开 my.cnf 配置文件
vim /etc/my.cnf1添加如下信息
port=1617 # 端口号自行选择1
重启 MySQL 服务
systemctl restart mysqld.service1如果出现
Job for mysqld.service failed because the control process exited with error code错误, 则检查 my.cnf 是否书写正确查看端口号是否已被修改 登录 MySQL
mysql -uroot -p
show global variables like 'port';
1
2
开放 MySQL 端口号
检查防火墙是否开启
systemctl status firewalld
或者
firewall-cmd --state
1
2
3若未安装防火墙, 则不管
yum install firewalld firewalld-config # 安装防火墙
systemctl start firewalld.service # 开启防火墙

# 其余常用命令
systemctl stop firewalld # 禁用防火墙
systemctl enable firewalld # 设置开机自启防火墙
sytemctl disable firewalld # 停止并禁用开机自启
firewall-cmd --reload # 重启防火墙
service firewalld restart # 重启防火墙
1
2
3
4
5
6
7
8
9开放端口号
firewall-cmd --zone=public --add-port=1617/tcp --permanent1重启防火墙
firewall-cmd --reload1出现 success 信息就算成功
更改 mysql 的语言 (后面有完整配置)
重新登录 MySQL, 并输入
status
正常刚安装上面两个编码集不是 utf8, 需要更改
更改编码集
退出 MySQL, 进入
/etc/my.cnfvim /etc/my.cnf1增加如下几行

[client]
default-character-set=utf8

socket=/var/lib/mysql/mysql.sock
character-set-server=utf8
collation-server=utf8_general_ci
1
2
3
4
5
6
7重启 MySQL
systemctl restart mysqld.service1再次查看, 确认已更改
最后, 使用可视化数据库管理软件连接 MySQL

MySQL安装完成!
# my.cnf 完整配置
[client]
port = 1617
socket = /tmp/mysql.sock
default-character-set=utf8mb4

[mysql]
no-auto-rehash
default-character-set = utf8mb4


[mysqld]

##############################基础设置#####################################

#Mysql服务的唯一编号 每个mysql服务Id需唯一
server-id = 1

#数据库错误日志文件
log_error = error.log

# Disabling symbolic-links is recommended to prevent assorted security risks
symbolic-links=0

pid-file=/var/run/mysqld/mysqld.pid

#服务端口号 默认3306
port = 1617

#mysql安装根目录
basedir = /var/lib/mysql

#mysql数据文件所在位置
datadir = /var/lib/mysql

#临时目录 比如load data infile会用到
tmpdir  = /tmp

#设置socke文件所在目录
socket  = /tmp/mysql.sock
#数据库默认字符集,主流字符集支持一些特殊表情符号(特殊表情符占用4个字节)
character-set-server = utf8mb4

#数据库字符集对应一些排序等规则,注意要和character-set-server对应
collation-server = utf8mb4_general_ci

#设置client连接mysql时的字符集,防止乱码
init_connect=‘SET NAMES utf8mb4‘

#是否对sql语句大小写敏感,1表示不敏感
lower_case_table_names = 1

#最大连接数
max_connections = 400

#最大错误连接数
max_connect_errors = 1000

#TIMESTAMP如果没有显示声明NOT NULL,允许NULL值
explicit_defaults_for_timestamp = true
2
3
4
5
6
7
8
9
10
11
12
13
14
15
16
17
18
19
20
21
22
23
24
25
26
27
28
29
30
31
32
33
34
35
36
37
38
39
40
41
42
43
44
45
46
47
48
49
50
51
52
53
54
55
56
57
58
59
超级详细版
[client]
port = 3306
socket = /tmp/mysql.sock

[mysqld]

###############################基础设置#####################################

#Mysql服务的唯一编号 每个mysql服务Id需唯一
server-id = 1

#服务端口号 默认3306
port = 3306

#mysql安装根目录
basedir = /opt/mysql

#mysql数据文件所在位置
datadir = /opt/mysql/data

#临时目录 比如load data infile会用到
tmpdir  = /tmp

#设置socke文件所在目录
socket  = /tmp/mysql.sock

#主要用于MyISAM存储引擎,如果多台服务器连接一个数据库则建议注释下面内容
skip-external-locking

#只能用IP地址检查客户端的登录,不用主机名
skip_name_resolve = 1

#事务隔离级别,默认为可重复读,mysql默认可重复读级别(此级别下可能参数很多间隙锁,影响性能)
transaction_isolation = READ-COMMITTED

#数据库默认字符集,主流字符集支持一些特殊表情符号(特殊表情符占用4个字节)
character-set-server = utf8mb4

#数据库字符集对应一些排序等规则,注意要和character-set-server对应
collation-server = utf8mb4_general_ci

#设置client连接mysql时的字符集,防止乱码
init_connect=‘SET NAMES utf8mb4‘

#是否对sql语句大小写敏感,1表示不敏感
lower_case_table_names = 1

#最大连接数
max_connections = 400

#最大错误连接数
max_connect_errors = 1000

#TIMESTAMP如果没有显示声明NOT NULL,允许NULL值
explicit_defaults_for_timestamp = true

#SQL数据包发送的大小,如果有BLOB对象建议修改成1G
max_allowed_packet = 128M

#MySQL连接闲置超过一定时间后(单位:秒)将会被强行关闭
#MySQL默认的wait_timeout  值为8个小时, interactive_timeout参数需要同时配置才能生效
interactive_timeout = 1800
wait_timeout = 1800

#内部内存临时表的最大值 ,设置成128M。
#比如大数据量的group by ,order by时可能用到临时表,
#超过了这个值将写入磁盘,系统IO压力增大
tmp_table_size = 134217728
max_heap_table_size = 134217728

#禁用mysql的缓存查询结果集功能
#后期根据业务情况测试决定是否开启
#大部分情况下关闭下面两项
query_cache_size = 0
query_cache_type = 0

#####################用户进程分配到的内存设置BEGIN#############################

##每个session将会分配参数设置的内存大小
#用于表的顺序扫描,读出的数据暂存于read_buffer_size中,当buff满时或读完,将数据返回上层调用者
#一般在128kb ~ 256kb,用于MyISAM
#read_buffer_size = 131072
#用于表的随机读取,当按照一个非索引字段排序读取时会用到,
#一般在128kb ~ 256kb,用于MyISAM
#read_rnd_buffer_size = 262144
#order by或group by时用到

#建议先调整为2M,后期观察调整
sort_buffer_size = 2097152

#一般数据库中没什么大的事务,设成1~2M,默认32kb
binlog_cache_size = 524288

########################用户进程分配到的内存设置END############################

#在MySQL暂时停止响应新请求之前的短时间内多少个请求可以被存在堆栈中
#官方建议back_log = 50 + (max_connections / 5),封顶数为900
back_log = 130

############################日志设置##########################################

#数据库错误日志文件
log_error = error.log

#慢查询sql日志设置
slow_query_log = 1
slow_query_log_file = slow.log

#检查未使用到索引的sql
log_queries_not_using_indexes = 1

#针对log_queries_not_using_indexes开启后,记录慢sql的频次、每分钟记录的条数
log_throttle_queries_not_using_indexes = 5

#作为从库时生效,从库复制中如何有慢sql也将被记录
log_slow_slave_statements = 1

#慢查询执行的秒数,必须达到此值可被记录
long_query_time = 8

#检索的行数必须达到此值才可被记为慢查询
min_examined_row_limit = 100

#mysql binlog日志文件保存的过期时间,过期后自动删除
expire_logs_days = 5

############################主从复制设置#####################################

#开启mysql binlog功能
log-bin=mysql-bin

#binlog记录内容的方式,记录被操作的每一行
binlog_format = ROW

#对于binlog_format = ROW模式时,减少记录日志的内容,只记录受影响的列
binlog_row_image = minimal

#master status and connection information输出到表mysql.slave_master_info中
master_info_repository = TABLE

#the slave‘s position in the relay logs输出到表mysql.slave_relay_log_info中
relay_log_info_repository = TABLE

#作为从库时生效,想进行级联复制,则需要此参数
log_slave_updates

#作为从库时生效,中继日志relay-log可以自我修复
relay_log_recovery = 1

#作为从库时生效,主从复制时忽略的错误
slave_skip_errors = ddl_exist_errors

#####################redo log和binlog的关系设置BEGIN#########################

#(步骤1) prepare dml相关的SQL操作,然后将redo log buff中的缓存持久化到磁盘
#(步骤2)如果前面prepare成功,那么再继续将事务日志持久化到binlog
#(步骤3)如果前面成功,那么在redo log里面写上一个commit记录
#当innodb_flush_log_at_trx_commit和sync_binlog都为1时是最安全的,
#在mysqld服务崩溃或者服务器主机crash的情况下,binary log只有可能丢失最多一个语句或者一个事务。
#但是都设置为1时会导致频繁的io操作,因此该模式也是最慢的一种方式。
#当innodb_flush_log_at_trx_commit设置为0,mysqld进程的崩溃会导致上一秒钟所有事务数据的丢失。
#当innodb_flush_log_at_trx_commit设置为2,只有在操作系统崩溃或者系统掉电的情况下,上一秒钟所有事务数据才可能丢失。

#commit事务时,控制redo log buff持久化磁盘的模式 默认为1
innodb_flush_log_at_trx_commit = 2

#commit事务时,控制写入mysql binlog日志的模式 默认为0
#innodb_flush_log_at_trx_commit和sync_binlog都为1时,mysql最为安全但性能上压力也是最大
sync_binlog = 1

####################redo log和binlog的关系设置END############################

############################Innodb设置#####################################

#数据块的单位8k,默认是16k,16kCPU压力稍小,8k对select的吞吐量大
#innodb_page_size的参数值也影响最大索引长度,8k比16k的最大索引长度小
#innodb_page_size = 8192

#一般设置物理存储的60% ~ 70%
innodb_buffer_pool_size = 1G

#5.7.6之后默认16M
#innodb_log_buffer_size = 16777216

#该参数针对unix、linux,window上直接注释该参数.默认值为NULL
#O_DIRECT减少操作系统级别VFS的缓存和Innodb本身的buffer缓存之间的冲突
innodb_flush_method = O_DIRECT

#此格式支持压缩, 5.7.7之后为默认值
innodb_file_format = Barracuda

#CPU多核处理能力设置,假设CPU是2颗4核的,设置如下
#读多,写少可以设成2:6的比例
innodb_write_io_threads = 4
innodb_read_io_threads = 4

#提高刷新脏页数量和合并插入数量,改善磁盘I/O处理能力
#默认值200(单位:页)
#可根据磁盘近期的IOPS确定该值
innodb_io_capacity = 500

#为了获取被锁定的资源最大等待时间,默认50秒,超过该时间会报如下错误:
# ERROR 1205 (HY000): Lock wait timeout exceeded; try restarting transaction
innodb_lock_wait_timeout = 30

#调整buffer pool中最近使用的页读取并dump的百分比,通过设置该参数可以减少转储的page数
innodb_buffer_pool_dump_pct = 40

#设置redoLog文件所在目录, redoLog记录事务具体操作内容
innodb_log_group_home_dir = /opt/mysql/redolog/

#设置undoLog文件所在目录, undoLog用于事务回滚操作
innodb_undo_directory = /opt/mysql/undolog/

#在innodb_log_group_home_dir中的redoLog文件数, redoLog文件内容是循环覆盖写入。
innodb_log_files_in_group = 3

#MySql5.7官方建议尽量设置的大些,可以接近innodb_buffer_pool_size的大小
#之前设置该值较大时可能导致mysql宕机恢复时间过长,现在恢复已经加快很多了
#该值减少脏数据刷新到磁盘的频次
#最大值innodb_log_file_size * innodb_log_files_in_group <= 512GB,单文件<=256GB
innodb_log_file_size = 1024M

#设置undoLog文件所占空间可以回收
#5.7之前的MySql的undoLog文件一直增大无法回收
innodb_undo_log_truncate = 1
innodb_undo_tablespaces = 3
innodb_undo_logs = 128

#5.7.7默认开启该参数 控制单列索引长度最大达到3072
#innodb_large_prefix = 1

#5.7.8默认为4个, Inodb后台清理工作的线程数
#innodb_purge_threads = 4

#通过设置配置参数innodb_thread_concurrency来限制并发线程的数量,
#一旦执行线程的数量达到这个限制,额外的线程在被放置到对队列中之前,会睡眠数微秒,
#可以通过设定参数innodb_thread_sleep_delay来配置睡眠时间
#该值默认为0,在官方doc上,对于innodb_thread_concurrency的使用,也给出了一些建议:
#(1)如果一个工作负载中,并发用户线程的数量小于64,建议设置innodb_thread_concurrency=0;
#(2)如果工作负载一直较为严重甚至偶尔达到顶峰,建议先设置innodb_thread_concurrency=128,
###并通过不断的降低这个参数,96, 80, 64等等,直到发现能够提供最佳性能的线程数
#innodb_thread_concurrency = 0

#强所有发生的死锁错误信息记录到error.log中,之前通过命令行只能查看最近一次死锁信息
innodb_print_all_deadlocks = 1

############################其他设置########################################

[mysqldump]
quick
max_allowed_packet = 128M

[mysql]
no-auto-rehash

[myisamchk]
key_buffer_size = 20M
sort_buffer_size = 256k
read_buffer = 2M
write_buffer = 2M

[mysqlhotcopy]
interactive-timeout

[mysqld_safe]
#增加每个进程的可打开文件数量
open-files-limit = 28192
2
3
4
5
6
7
8
9
10
11
12
13
14
15
16
17
18
19
20
21
22
23
24
25
26
27
28
29
30
31
32
33
34
35
36
37
38
39
40
41
42
43
44
45
46
47
48
49
50
51
52
53
54
55
56
57
58
59
60
61
62
63
64
65
66
67
68
69
70
71
72
73
74
75
76
77
78
79
80
81
82
83
84
85
86
87
88
89
90
91
92
93
94
95
96
97
98
99
100
101
102
103
104
105
106
107
108
109
110
111
112
113
114
115
116
117
118
119
120
121
122
123
124
125
126
127
128
129
130
131
132
133
134
135
136
137
138
139
140
141
142
143
144
145
146
147
148
149
150
151
152
153
154
155
156
157
158
159
160
161
162
163
164
165
166
167
168
169
170
171
172
173
174
175
176
177
178
179
180
181
182
183
184
185
186
187
188
189
190
191
192
193
194
195
196
197
198
199
200
201
202
203
204
205
206
207
208
209
210
211
212
213
214
215
216
217
218
219
220
221
222
223
224
225
226
227
228
229
230
231
232
233
234
235
236
237
238
239
240
241
242
243
244
245
246
247
248
249
250
251
252
253
254
255
256
257
258
259
260
261
262
263
264
265
266
267
268
注意 : 上述的文件不建议全部拷贝使用,当需要哪块时单独复制是最好的,因为每台服务器的需求都不一样
# MySQL 配置文件
- 二进制文件 log-bin : 主从复制
- 错误日志 log-err : 默认是关闭的, 记录严重的警告和错误信息, 每次启动和关闭的详细信息等
- 查询日志 log : 默认关闭, 记录查询的 sql 语句, 如果开启会减低 mysql 的整体性能
- 数据文件
- 两系统 :
- windows : MySQL 安装路径下的 data 目录下
- linux : 默认路径
/var/lib/mysql
- frm 文件 : 存放表结构
- myd 文件 : 存放表数据
- myi 文件 : 存放表索引
- 两系统 :
- 如何配置 :
- windows : my.ini 文件
- linux :
/etc/my.cnf文件
# MySQL 逻辑架构介绍
总体概述
和其他数据相比, mysql有点儿与众不同, 它的架构可以在多种不同场景中应用并发挥良好作用, 主要体现在存储引擎的架构上 插件式的存储引擎架构将查询出来和其他的系统任务以及数据库的存储提取相分离, 这种架构可以根据业务的需求和实际需求选择合适的存储引擎
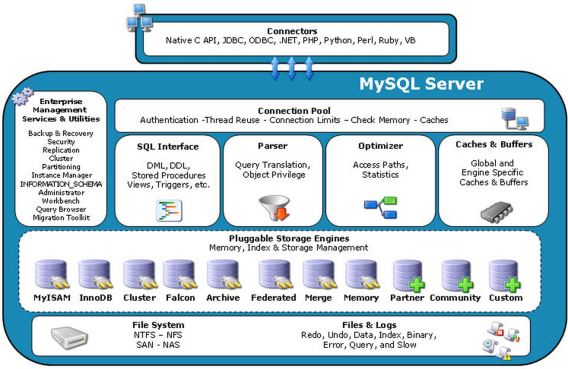
图解
- Connectors 指的是不同语言中与 sql 的交互
- Management Serveices & Utilities 系统管理和控制工具
- Connection Pool : 连接池 管理缓冲用户连接, 线程处理等需要缓存的需求. 负责监听对 MySQL Server 的各种请求,接收连接请求,转发所有连接请求到线程管理模块。每一个连接上 MySQL Server 的客户端请求都会被分配 (或创建) 一个连接线程为其单独服务。而连接线程的主要工作就是负责 MySQL Server 与客户端的通信. 接受客户端的命令请求,传递 Server 端的结果信息等, 线程管理模块则负责管理维护这些连接线程. 包括线程的创建, 线程的 cache 等
- SQL Interface : SQL接口 接受用户的SQL命令, 并且返回用户需要查询的结果. 比如 select from 就是调用 SQL Interface
- Parser : 解析器
SQL命令传递到解析器的时候会被解析器验证和解析. 解析器是由Lex和YACC实现的, 是一个很长的脚本
在 MySQL中我们习惯将所有 Client 端发送给 Server 端的命令都称为 query, 在 MySQL Server 里面, 连接线程接收到客户端的一个 Query 后, 会直接将该 query 传递给专门负责将各种 Query 进行分类然后转发给各个对应的处理模块
主要功能 :
- 将SQL语句进行语义和语法的分析, 分解成数据结构, 然后按照不同的操作类型进行分类, 然后做出针对性的转发到后续步骤, 以后SQL语句的传递和处理就是基于这个结构的
- 如果在分解构成中遇到错误, 那么就说明这个sql语句是不合理的
- Optimizer : 查询优化器
SQL语句在查询之前会使用查询优化器对查询进行优化. 就是优化客户端请求的 query(sql语句), 根据客户端请求的 query 语句, 和数据库中的一些统计信息, 在一系列算法的基础上进行分析, 得出一个最优的策略, 告诉后面的程序如何取得这个 query 语句的结果
他使用的是 "选取 - 投影 - 联接" 策略进行查询
用一个例子就可以理解 :
select uid,name from user where gender = 1;这个 select 查询先根据 where 语句进行选取, 而不是先将表全部查询出来以后再进行 gender 过滤 这个 select 查询先根据 uid 和 name 进行属性投影, 而不是将属性全部取出以后再进行过滤 将这两个查询条件联接起来生成最终查询结果 - Cache和Buffer : 查询缓存 他的主要功能是将客户端提交给 MySQL 的 Select 类 query 请求的返回结果集 cache 到内存中, 与该 query 的一个 hash 值做一个对应. 该 Query 所取数据的基表发生任何数据的变化之后, MySQL 会自动使该 query 的 Cache 失效. 在读写比例非常高的应用系统中,Query Cache 对性能的提高是非常显著的. 当然它对内存的消耗也是非常大的 如果查询缓存有命中的查询结果, 查询语句就可以直接去查询缓存中取数据. 这个缓存机制是由一系列小缓存组成的. 比如表缓存, 记录缓存, key缓存, 权限缓存等
- Pluggable Stroage Engines : 存储引擎接口 存储引擎接口模块可以说是 MySQL 数据库中最有特色的一点了. 目前各种数据库产品中, 基本上只有 MySQL 可以实现其底层数据存储引擎的插件式管理. 这个模块实际上只是一个抽象类, 但正是因为它成功地将各种数据处理高度抽象化, 才成就了今天 MySQL 可插拔存储引擎的特色. 从图中还可以看出, MySQL区别于其他数据库的最重要的特点就是其插件式的表存储引擎. MySQL插件式的存储引擎架构提供了一系列标准的管理和服务支持, 这些标准与存储引擎本身无关, 可能是每个数据库系统本身都必需的, 如SQL分析器和优化器等, 而存储引擎是底层物理结构的实现, 每个存储引擎开发者都可以按照自己的意愿来进行开发. 注意 : 存储引擎是基于表的, 而不是数据库
层解
- 连接层 最上面是一些客户端和连接服务, 包含本地 sock 通信和大多数基于客户端/服务端工具实现的类似于 tcp/ip 的通信. 主要完成一些类似于连接处理, 授权认证及相关的安全方案. 在该层上引入了线程池的概念, 为通过认真安全接入的客户端提供线程, 同样在该层上可以实现基于 SSL 的安全链接, 服务器也会为安全接入的每个客户端验证它所具有的操作权限
- 服务层 第二层架构主要完成主要的核心服务功能, 如 sql 接口, 并完成缓存的查询, sql 的分析和优化及部分内置函数的执行. 所有跨存储引擎的功能也在这一层实现, 如过程, 函数等. 在这层, 服务器会解析查询并创建相应的内部解析树, 并对其完成相应的优化如确定查询表的顺序, 是否利用索引等, 最后生成相应的执行操作, 如果是 select 语句, 服务器还会查询内部的缓存, 如果缓存空间够大, 这样在解决大量读操作的环境中能很好的提升系统的性能
- 引擎层 存储引擎层, 存储引擎真正的负责了 MySQL 中数据的存储和提取, 服务器通过 API 与存储引擎进行通信, 不同的存储引擎具有不同的功能, 这样我们可以根据自己的实际需求进行选取, 主要是 MyLSAM 和 InnoDB
- 存储层 数据存储层, 主要是将数据存储在运行于裸设备的文件系统之上, 并完成于存储系统的交互
MySQL 存储引擎
查看命令
show engines; 
查看 mysql 当前的默认存储引擎
show variables like '%storage_engine';

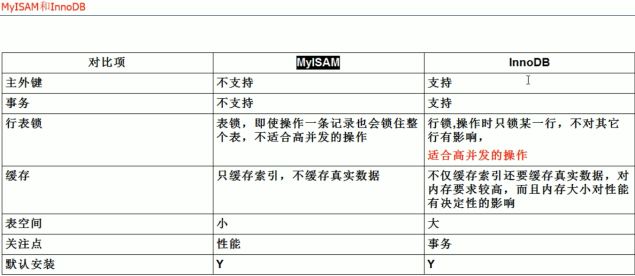
MyLSAM 和 InnoDB
# 索引优化分析
# 常见通用的 join 查询
# sql 执行顺序
手写

机读

总结

# join 图

# 代码
use test1;

create table tbl_dept (
    id INT(11) not null auto_increment,
    deptName varchar(30) default null,
    locAdd varchar(40) default null,
    PRIMARY KEY (id)
) ENGINE = INNODB AUTO_INCREMENT = 1 DeFAULT CHARSET = utf8;

create table tbl_emp (
    id INT(11) not null auto_increment,
    name varchar(30) default null,
    deptId INT(11) default null,
    primary key (id)
    # CONSTRAINT fk_dept_id FOREIGN KEY (deptId) REFERENCES tbl_dept(id)
) ENGINE = INNODB AUTO_INCREMENT = 1 DeFAULT CHARSET = utf8;

insert into tbl_dept(deptName, locAdd) VALUES ('RD', 11);
insert into tbl_dept(deptName, locAdd) VALUES ('HR', 12);
insert into tbl_dept(deptName, locAdd) VALUES ('MK', 13);
insert into tbl_dept(deptName, locAdd) VALUES ('MIS', 14);
insert into tbl_dept(deptName, locAdd) VALUES ('FD', 15);

insert into tbl_emp(name, deptId) VALUES ('z3', 1);
insert into tbl_emp(name, deptId) VALUES ('z4', 1);
insert into tbl_emp(name, deptId) VALUES ('z5', 1);

insert into tbl_emp(name, deptId) VALUES ('w5', 2);
insert into tbl_emp(name, deptId) VALUES ('w6', 2);

insert into tbl_emp(name, deptId) VALUES ('s7', 3);

insert into tbl_emp(name, deptId) VALUES ('s8', 4);

insert into tbl_emp(name, deptId) VALUES ('s9', 51);


# 单表查询 tbl_dept
select * from tbl_dept;

# 单表查询 tbl_emp
select * from tbl_emp;

# 笛卡尔乘积
select * from tbl_emp, tbl_dept;

# 情况一
select * from tbl_emp te join tbl_dept td on td.id = te.deptId;

# 情况二
select * from tbl_emp te left join tbl_dept td on td.id = te.deptId;

# 情况三
select * from tbl_emp te right join tbl_dept td on td.id = te.deptId;

# 情况四
select * from tbl_emp te left join tbl_dept td on te.deptId = td.id where td.id is null;

# 情况五
select * from tbl_emp te right join tbl_dept td on te.deptId = td.id where te.deptId is null;

# full join MySQL不支持
# 情况六
# select * from tbl_emp te full join tbl_dept td on te.deptId = td.id;

# 情况七
# select * from tbl_emp te full join tbl_dept td on te.deptId = td.id where td.id is null and te.deptId is null;

# 方式一 : union
# 情况六
select * from tbl_emp te left join tbl_dept td on td.id = te.deptId
union
select * from tbl_emp te right join tbl_dept td on te.deptId = td.id;

# 情况七
Explain select * from tbl_emp te left join tbl_dept td on td.id = te.deptId where td.id is null
union
select * from tbl_emp te right join tbl_dept td on te.deptId = td.id where te.deptId is null;
2
3
4
5
6
7
8
9
10
11
12
13
14
15
16
17
18
19
20
21
22
23
24
25
26
27
28
29
30
31
32
33
34
35
36
37
38
39
40
41
42
43
44
45
46
47
48
49
50
51
52
53
54
55
56
57
58
59
60
61
62
63
64
65
66
67
68
69
70
71
72
73
74
75
76
77
78
79
# 索引
# 简介
概念
MySQL 官方对索引的定义为 : 索引 (index) 是帮助 MySQL 高效获取数据的数据结构
可以将其简单理解为 : ==排好序的快速查找数据结构==

结论 : 数据本身之外,数据库还维护着一个满足特定查找算法的数据结构,这些数据结构以某种方式指向数据, 这样就可以在这些数据结构的基础上实现高级查找算法,这种数据结构就是索引。
一般来说索引本身也很大,不可能全部存储在内存中,因此索引往往以文件形式存储在硬盘上
我们平时所说的索引,如果没有特别指明,都是指==B树== (多路搜索树,并不一定是二叉树) 结构组织的索引
其中聚集索引, 次要索引, 覆盖索引, 复合索引, 前缀索引, 唯一索引默认都是使用 B+ 树索引, 统称索引. 当然, 除了 B+ 树这种类型的索引之外, 还有哈希索引 (hash index) 等。
优势
- 类似于大学图书馆建书目索引, 提高数据的检索效率, 降低了数据库的 IO 成本
- 通过索引列对数据进行排序, 降低数据排序成本, 降低了 CPU 的消耗
劣势
- 实际上索引也是一张表, 该表保存了主键和索引字段, 并指向实体表的记录, 索引索引列也是要占用空间的
- 虽然索引大大提高了查询速度, 同时却会降低更新表的速度, 如果对表 insert update delete, 将会消耗更多的时间, 因为更新表时, MySQL 不仅要修改数据, 还要修改索引列
- 索引只是提高效率的一个因素, 如果你的 MySQL 有大数据量的表, 就需要花时间研究建立优秀的索引, 或优化查询语句
# MySQL 索引分类
单值索引
即一个索引值包含单个列, 一个表可以有多个单列索引
注意 : 建议一张表索引不要超过5个, 优先考虑复合索引
唯一索引
索引列的值必须唯一, 但是允许有空值 (unique)
复合索引
即一个索引包含多个列 (最常使用)
# 索引的基本语法
创建
# alter 方式
# 该语句添加一个主键, 这意味着索引值必须是唯一的
alter table tbl_name add primary key (column_list);

# 这条语句创建索引的值必须是唯一的 (除了 null, null 可能会出现多次)
alter table tbl_name add unique index_name (column_list);

# 添加普通索引, 索引值可出现多次
alter table tbl_name add index index_name (column_list);

# 该语句指定类索引为 fulltext, 用于全文索引
alter table tbl_name add fulltext index_name (column_list);

# create 方式
# 如果是 CHAR, VARCHAR 类型,length 可以小于字段实际长度;
# 如果是 BLOB 和 TEXT 类型,必须指定 length。
CREATE [UNIQUE] INDEX  indexName ON mytable(columnname(length));
2
3
4
5
6
7
8
9
10
11
12
13
14
15
16
17
删除
drop index [indexName] on mytable;
查看
show index from table_name
# MySQL 索引结构
- BTree 索引
- Hash 索引 (了解)
- full-text 全文索引 (了解)
- R-Tree 索引 (了解)
# BTree

初始化介绍 一颗 b+ 树, 浅蓝色的块我们称之为一个磁盘块, 可以看到每个磁盘块包含了几个数据项 (深蓝色显示) 和指针 (黄色显示). 如磁盘块 1 包含了数据项 17 - 35, 包含指针 P1, P2, P3 P1 表示小于 17 的磁盘块, P2 表示在 17 - 35 之间的磁盘块, P3 表示大于 35 的磁盘块 真实的数据存在于叶子节点, 即 3, 5, 9, 10 ... 非叶子节点不存储真实的数据, 只存储指引搜索方法的数据项, 如 17, 35 并不存在与数据表中
查找过程 如果要查找数据项 20, 那么首先会把磁盘块 1 由磁盘加载到内存, 此时发生一次 IO, 在内充中用二分法查找确定 29 在 17 和 35 之间, 锁定磁盘块 1 的 P2 指针, 内存时间非常短 (相较于磁盘的 IO), 可以忽略不急, 通过磁盘块 1 的 P2 指针指向的磁盘地址, 将磁盘块 3 加载到内存中吗发生第二次 IO, 确认 29 在 26 和 30 之间, 锁定磁盘块的 P2 指针, 通过指针将磁盘块 8 加载到内存, 发生第三次 IO, 同时在内存中做二分查找到 29, 结束查询, 总计 3 次 IO
Btree索引 (或Balanced Tree), 是一种很普遍的数据库索引结构, oracle 默认的索引类型 (本文也主要依据 oracle 来讲). 其特点是定位高效 利用率高 自我平衡, 特别适用于高基数字段, 定位单条或小范围数据非常高效. 理论上, 使用 Btree 在亿条数据与 100 条数据中定位记录的花销相同
数据结构利用率高, 定位高效
Btree索引的数据结构如下 :
 结构看起来 Btree 索引与 Binary Tree 相似, 但在细节上有所不同
Btree 索引的几个主要特点 :
- 树形结构 : 由根节 (root), 分支 (branches), 叶 (leaves)三级节点组成, 其中分支节点可以有多层
- 多分支结构 : 与 binary tree 不相同的是, btree 索引中单 root/branch 可以有多个子节点 (超过2个)
- 双向链表 : 整个叶子节点部分是一个双向链表 (后面会描述这个设计的作用)
- 单个数据块中包括多条索引记录
结构上Btree与Binary Tree的区别
结构上 Btree 与 Binary Tree 的区别, 在于 binary 中每节点代表一个数值, 而 balanced 中 root 和 Btree 节点中记录了多条 "值范围" 条目 (如 : [60-70][70-80]), 这些 "值范围" 条目分别指向在其范围内的叶子节点. 即 root 与 branch 可以有多个分支, 而不一定是两个, 对数据块的利用率更高
在 Leaf 节点中, 同样也是存放了多条索引记录, 这些记录就是具体的索引列值, 和与其对应的 rowid. 另外, 在叶节点层上, 所有的节点在组成了一个双向链表
了解基本结构后,下图展示定位数值 82 的过程:

演算如下
- 读取 root 节点, 判断 82 大于在 0 - 120 之间, 走左边分支
- 读取左边 branch 节点, 判断 82 大于 80 且小于等于 120, 走右边分支
- 读取右边 leaf 节点, 在该节点中找到数据 82 及对应的 rowid
- 使用 rowid 去物理表中读取记录数据块 (如果是 count 或者只 select rowid, 则最后一次读取不需要)
在整个索引定位过程中,数据块的读取只有 3 次. 既三次 I/O 后定位到 rowid
而由于 Btree 索引对结构的利用率很高, 定位高效. 当 1 千万条数据时, Btree 索引也是三层结构 (依稀记得亿级数据才是 3 层与 4 层的分水岭). 定位记录仍只需要三次 I/O, 这便是开头所说的, 100 条数据和 1 千万条数据的定位, 在 btree 索引中的花销是一样的
平衡扩张
除了利用率高, 定位高效外, Btree 的另一个特点是能够永远保持平衡, 这与它的扩张方式有关. (unbalanced 和 hotspot 是两类问题, 之前我一直混在一起), 先描述下 Btree 索引的扩张方式 :
新建一个索引, 索引上只会有一个 leaf 节点, 取名为 Node A, 不断的向这个 leaf 节点中插入数据后, 直到这个节点满, 这个过程如下图(绿色表示新建/空闲状态, 红色表示节点没有空余空间) :

当 Node A 满之后, 我们再向表中插入一条记录, 此时索引就需要做拆分处理 : 会新分配两个数据块 NodeB & C, 如果新插入的值大于当前最大值, 则将 Node A 中的值全部插入 Node B 中, 将新插入的值放到 Node C 中; 否则按照 5 - 5 比例, 将已有数据分别插入到 NodeB 与 C 中
无论采用哪种分割方式, 之前的 leaf 节点 A, 将变成一个 root 节点, 保存两个范围条目, 指向 B 与 C , 结构如下图(按第一种拆分形式) :

当 Node C 满之后, 此时 Node A 仍有空余空间存放条目, 所以不需要再拆分, 而只是新分配一个数据块 Node D, 将在 Node A 中创建指定到 Node D 的条目 :

如果当根节点 Node A 也满了, 则需要进一步拆分 : 新建 Node E & F & G, 将 Node A 中范围条目拆分到 E & F 两个节点中, 并建立 E & F 到 BCD 节点的关联, 向 Node G 插入索引值. 此时 E & F 为 branch 节点, G 为 leaf 节点, A 为 Root 节点 :

在整个扩张过程中, Btree 自身总能保持平衡, Leaf 节点的深度能一直保持一致
# 何时该建索引 ?
何时该建索引
- 主键自动建立唯一索引
- 频繁作为查询的条件的字段应该创建索引
- 查询中与其他表关联的字段,外键关系建立索引
- 频繁更新的字段不适合创建索引
- 因为每次更新不单单是更新了记录还会更新索引,加重IO负担
- Where条件里用不到的字段不创建索引
- 单间/组合索引的选择问题, who ? (在高并发下倾向创建组合索引)
- 查询中排序的字段,排序字段若通过索引去访问将大大提高排序的速度
- 查询中统计或者分组字段
何时不该建索引
- 表记录太少
- 经常增删改的表
- 数据重复且分布平均的表字段, 因此应该只为经常查询和经常排序的数据列建立索引
- 如果某个数据列包含许多重复的内容, 为它建立索引就没有太大的实际效果
# 性能分析
MySQL Query Optimizer
MySQL 中有专门赋值优化 select 语句的优化器模块, 即 MySQL Query Optimizer
主要功能 : 通过计算分析系统中收集到的统计信息, 为客户端请求的 Query 提供它认为最优的执行计划 (这部分也许是最耗时间的)
当客户端向 MySQL 请求一条 Query, 命令解析器模块完成请求分类, 区别出是 select 并转发给MySQL Query Optimizer 时, MySQL Query Optimizer 首先会对整条 query 语句进行优化, 处理掉一些常量表达式的预算, 直接转换成常量值, 并对 query 中查询条件进行简化和转换, 然后分析 query 中的 hint 信息 (如果有的话), 看显示 hint 信息是否可以完全确定该 query 的执行计划, 如果没有 hint 或 hint 信息还不足完全确定执行计划, 则会读取所涉及对象的统计信息, 根据 query 进行写相应的计算分析, 然后再得出最后的执行计划
MySQL 常见瓶颈
- CPU : CPU 在饱和的时候一般发生在数据装入在内存或从磁盘上读取数据时候
- IO : 磁盘 I/O 瓶颈发生在装入数据远大于内存容量时
- 服务器硬件的性能瓶颈 : top, free, iostat 和 vmstat 来查看系统的性能状态
# explain
概念
使用 explain 关键字可以模拟优化器执行 sql 语句,从而知道 MySQL 是如何处理你的 sql 语句的, 分析你的查询语句或是结构的性能瓶颈
explain 的作用
- 获取表的读取顺序 (id)
- 获取数据读取操作的操作类型 (type)
- 获取哪些索引可以使用 (possible_key)
- 获取哪些索引被实际使用 (key)
- 获取表之间的引用 (ref)
- 获取每张表有多少行被优化 (rows)
explain 使用语法
explain + sql 语句;
执行计划包含的信息

# explain 字段解析
id ☆
select 查询的序列号, 包含一组数字, 表示查询中执行 select 子句或操作表的顺序
id 分为三种情况 :
id 相同 : 执行顺序由上至下

id 不同 : 如果是子查询, id 的序号会递增, id 值越大优先级越高, 越先被执行

id 相同不同, 同时存在

select_type
select_type 分为以下几种
- SIMPLE : 简单的 select 查询, 查询中不包含子查询或者 union
- PRIMARY : 查询中若包含任何复杂的子部分, 最外层查询则被标记为 PRIMARY
- SUBQUERY : 在 select 或者 where 列表中包含了子查询
- DERIUED : 在 from 列表中包含的子查询被标记为 DERIVED(衍生), MySQL 会递归执行这些子查询, 把结果放在临时表里
- UNION : 若第二个 select 出现在 union 之后, 则被标记为 UNION; 若 union 包含在 FROM 子句的子查询中, select : DERIVED
- UNION RESULT : 从 union 表获取结果的 select
table
显示这一行的数据是关于哪张表的
partitions
type ☆
大致分为以下几种 :
- ALL
- index
- range
- ref
- eq_ref
- const, system
- Null
type 显示的是访问类型, 是较为重要的一个值, 结果值从好到坏依次是 :
全面对比 : system > const > eq_ref > ref > fulltest > ref_or_not > index_merge > unique_subquery > index_subquery > range > index > All
常见对比 : system > const > eq_ref > ref > range > index > All
一般来说, 得保证查询至少达到 range 级别, 最好能达到 ref
常见 type 类型详解 :
- system : 表只有一行记录 (等于系统表), 这是 const 类型的特例, 平时不会出现, 这个可以忽略不计
- const 表示通过索引一次就找到了, const 用于比较 primary key 或者 unique 索引. 因为只匹配一行数据, 所以很快. 如将主键至于 where 列表中, MySQL 就能将该查询转换为一个常量
- eq_ref 唯一性索引, 对于每个索引键, 表中只有一条记录与之匹配, 常见于主键或唯一索引扫描
- ref 非唯一索引扫描, 返回匹配某个单独值的所有行 本质上也是一种索引访问, 它返回所有匹配某个单独值的行. 然而, 它可能会找到多个符合条件的行, 所以他应该属于查找和扫描的混合体
- range 只检索给定范围的行, 使用一个索引来选择行. key 列显示使用了哪个索引 一般就是在你的 where 语句中出现了 between, <, >, in 等的查询 这种范围扫描索引扫描比全表扫描要好, 因为他只需要开始索引的某一点, 而结束于另一点, 不用扫描全部索引
- index Full Index Scan index 与 ALL 区别为 index 类型只遍历索引树. 这通常比 ALL 快, 因为索引文件通常比数据文件小 (也就是说虽然 all 和 index 都是读全表, 但 index 是从索引中读取的, 而 all 是从硬盘中读的)
- all FullTable Scan, 将遍历全表以找到匹配的行
possible_key
显示可能应用在这张表中的索引, 一个或多个 查询涉及的字段上若存在索引, 则该索引将被列出, 但不一定被查询实际使用
key ☆
实际使用的索引, 如果为 null 则没有使用索引 查询中若使用了覆盖索引, 则索引和查询的 select 字段重叠, 此时 Extra 显示 Using index
key_len
表示索引中使用的字节数, 可通过该列计算查询中使用的索引的长度 在不损失精确性的情况下, 长度越短越好 key_len 显示的值为索引最大可能长度, 并非实际使用长度, 即 key_len 是根据表定义计算而得, 不是通过表内检索出的
ref ☆
显示索引那一列被使用了, 如果可能的话, 是一个常数. 那些列或常量被用于查找索引列上的值

rows ☆
根据表统计信息及索引选用情况, 大致估算出找到所需的记录所需要读取的行数, 越少越好

filtered
Extra ☆
包含不适合在其他列中显示但十分重要的额外信息 大致分为以下几种 :
- Using filesort (九死一生)
说明 MySQL 会对数据使用一个外部的索引排序, 而不是按照表内的索引顺序进行读取
MySQL 中无法利用索引完成排序操作成为 "文件排序"

- Using temporary (十死无生)
使用了临时表保存中间结果, MySQL 在对查询结果排序时使用临时表.
常见于排序 order by 和分组查询 group by

- Using index (好 !)
表示相应的 select 操作中使用了覆盖索引 (Coveing Index), 避免访问了表的数据行, 效率不错 !
如果同时出现 using where, 表明索引被用来执行索引键值的查找
如果没有同时出现 using where, 表面索引用来读取数据而非执行查找动作

- Using where 表面使用了where过滤
- Using join buffer 使用了连接缓存
- impossible where
where 子句的值总是 false, 不能用来获取任何元组

- select tables optimized away 在没有 group by 子句的情况下, 基于索引优化 MIN/MAX 操作或者对于 MyISAM 存储引擎优化COUNT(*) 操作, 不必等到执行阶段再进行计算, 查询执行计划生成的阶段即完成优化.
- distinct 优化 distinct, 在找到第一匹配的元组后即停止找同样值的工作
# 索引优化
# 索引分析
# 单表分析
代码
create table if not exists article (
    id INT(10) unsigned not null primary key auto_increment,
    author_id INT(10) unsigned not null,
    category_id INT(10) unsigned not null,
    views INT(10) unsigned not null,
    comments INT(10) unsigned not null,
    title VARBINARY(255) not null,
    content TEXT not null
);

truncate table article;

insert into article(author_id, category_id, views, comments, title, content) VALUES
(1, 1, 1, 1, '1', '1'),
(2, 2, 2, 2, '2', '2'),
(1, 1, 3, 3, '3', '3');

select * from article;

# 查询 category_id 为 1, 且 comments 大于 1 的情况下, views 最多的 article_id
# type = ALL, key = null, ref = null, rows = 3, Extra 包含 Using filesort
# 结论, type = ALL 且 Extra 出现了 Using filesort, 需要优化
explain select id, author_id from article where category_id = 1 and comments > 1 order by views DESC limit 1;

# 查看表的索引
show index from article;

# 开始优化
# 1.1 建立索引 + 删除索引
alter table article add index idx_article_ccv(category_id, comments, views);
show index from article;

# type = range, key = idx_article_ccv, ref = null rows = 3 Extra 包含 Using index condition; Using filesort
explain select id, author_id from article where category_id = 1 and comments > 1 order by views DESC limit 1;
# Extra 包含 Using where
explain select id, author_id from article where category_id = 1 and comments = 1 order by views DESC limit 1;
#
/*
 结论 :
 type 变成了 range, 这是可以忍受的, 但是 Extra 中使用 Using filesort, 这是无法接受的
 但是我们已经建立了索引, 为啥没用呢 ?
 这是因为按照 BTree 索引的工作原理,
 先排序 category_id, 如果遇到相同的 category_id, 则再排序 comments, 如果遇到相同的 comments, 则再排序 views
 当 comments 字段在联合索引中处于中间位置时,
 因 comments > 1 条件是一个范围值 (所谓 range),
 MySQL 无法利用索引再对后面的 views 部分进行检索, 级 range 类型查询字段后面的索引无效
 */


# 删除索引
drop index idx_article_ccv on article;

# 1.2 建立索引
alter table article add index idx_article_cv(category_id, views);
show index from article;

# type = ref, key = idx_article_cv, ref = const, rows = 2 Extra 包含 Using where 完美!
explain select id, author_id from article where category_id = 1 and comments > 1 order by views DESC limit 1;

# 删除索引
drop index idx_article_cv on article;
2
3
4
5
6
7
8
9
10
11
12
13
14
15
16
17
18
19
20
21
22
23
24
25
26
27
28
29
30
31
32
33
34
35
36
37
38
39
40
41
42
43
44
45
46
47
48
49
50
51
52
53
54
55
56
57
58
59
60
61
# 双表分析
代码
create table if not exists class (
    id INT(10) unsigned not null auto_increment,
    card INT(10) unsigned not null,
    primary key (id)
);

create table if not exists book (
    bookid INT(10) unsigned not null auto_increment,
    card INT(10) unsigned not null,
    primary key (bookid)
);

# 执行多次, 20+
insert into class(card) values (FLOOR(1 + (RAND() * 20)));

insert into book(card) values (FLOOR(1 + (RAND() * 20)));

# 两表均 24 行数据

select * from class;
select * from book;

select * from book b inner join class c on b.card = c.card;

select * from book b left join class c on b.card = c.card;

# 案例 : 下面开始 explain 分析
# class : type = ALL, key = null, ref = null, rows = 24, Extra = null
# book : type = ALL, key = null, ref = null, rows = 24, Extra = Using where; Using join buffer (Block Nested Loop)
explain select * from class left join book on class.card = book.card;
# 结论 : Type = ALL, qie Extra 中有 Using join buffer (Block Nested Loop), 需要优化


# 1.1 添加索引 book 表
alter table book add index Y(card);
show index from book;

# class : type = ALL, key = null, ref = null, rows = 24, Extra = null
# book : type = ref, key = Y, ref = test1.class.card, rows = 1, Extra = Using index
explain select * from class left join book on class.card = book.card;

drop index Y on book;

# 1.2 添加索引 class 表
alter table class add index Y(card);
show index from class;

# 左连接
# class : type = index, key = Y, ref = null, rows = 24, Extra = Using index
# book : type = ALL, key = null, ref = null, rows = 24, Extra = Using where; Using join buffer (Block Nested Loop)
explain select * from class left join book on class.card = book.card;

# 右连接
# book : type = ALL, key = null, ref = null, rows = 24, Extra = null
# class : type = ref, key = Y, ref = test1.class.card, rows = 1, Extra = Using index
explain select * from class right join book on class.card = book.card;

drop index Y on class;
/*
 结论 :
 可以看到第二行的 type 变成了 ref, rows 优化也比较明显
 这是由左连接特性决定的,
 left join 条件用于确定如何从右表搜索行, 左边一定都有
 所以右边是我们的关注点, 一定要建立索引
 同理
 right join 条件用于确定如何从左边搜索行, 右边一定都有
 所以左边是我们的关注点, 一定要建立索引
 */
2
3
4
5
6
7
8
9
10
11
12
13
14
15
16
17
18
19
20
21
22
23
24
25
26
27
28
29
30
31
32
33
34
35
36
37
38
39
40
41
42
43
44
45
46
47
48
49
50
51
52
53
54
55
56
57
58
59
60
61
62
63
64
65
66
67
68
69
# 三表分析
代码
create table if not exists phone (
    phoneid INT(10) unique not null auto_increment,
    card INT(10) unsigned not null,
    primary key (phoneid)
) engine = INNODB;

insert into phone(card) values (FLOOR(1 + (RAND() * 20)));
insert into phone(card) values (FLOOR(1 + (RAND() * 20)));
insert into phone(card) values (FLOOR(1 + (RAND() * 20)));
insert into phone(card) values (FLOOR(1 + (RAND() * 20)));
insert into phone(card) values (FLOOR(1 + (RAND() * 20)));
insert into phone(card) values (FLOOR(1 + (RAND() * 20)));
insert into phone(card) values (FLOOR(1 + (RAND() * 20)));
insert into phone(card) values (FLOOR(1 + (RAND() * 20)));


select * from phone;

# 建立索引
alter table phone add index Z(card);
alter table class add index Y(card);
show index from phone;
show index from class;
show index from book;

# 删除索引
drop index Y on class;
drop index Z on phone;

# 案例
# book : type = ALL, key = null, ref = null, rows = 24, Extra = null
# class : type = ALL, key = null, ref = null, rows = 24, Extra = Using where; Using join buffer (Block Nested Loop)
# phone : type = ALL, key = null, ref = null, rows = 24, Extra = Using where; Using join buffer (Block Nested Loop)
explain select * from book b left join class c on b.card = c.card left join phone p on b.card = p.card;
# 需要优化

# 1.1 建立索引, phone class
alter table phone add index Z(card);
alter table class add index Y(card);
show index from phone;
show index from class;

# book : type = ALL, key = null, ref = null, rows = 24, Extra = null
# class : type = ref, key = Y, ref = test1.b.card, rows = 1, Extra = Using index
# phone : type = ref, key = Z, ref = test1.b.card, rows = 1, Extra = Using index
explain select * from book b left join class c on b.card = c.card left join phone p on b.card = p.card;

/*
 结论 :
    后两行的 type 都是 ref 且总 rows 优化很好, 效果不错, 隐藏索引最好设置在需要经常查询的字段中

 结论 : join 语句的优化
    1. 尽可能减少 join 语句中的 NestedLoop 的循环总次数 : "永远用小结果集驱动大的结果集"
    2. 优先优化 NestedLoop 的内存循环
    3. 保证 join 语句中被驱动表上 join 条件字段已经被索引
    4. 当无法保证被驱动表的 join 条件字段被索引且内存资源充足的前提下, 不要太吝啬 JoinBuffer 的设置
 */
2
3
4
5
6
7
8
9
10
11
12
13
14
15
16
17
18
19
20
21
22
23
24
25
26
27
28
29
30
31
32
33
34
35
36
37
38
39
40
41
42
43
44
45
46
47
48
49
50
51
52
53
54
55
56
57
58
# 练习
代码
create table test03 (
    id INT primary key not null auto_increment,
    c1 CHAR(10),
    c2 CHAR(10),
    c3 CHAR(10),
    c4 CHAR(10),
    c5 CHAR(10)
);

insert into test03(c1, c2, c3, c4, c5) VALUES ('a1', 'a2', 'a3', 'a4', 'a5');
insert into test03(c1, c2, c3, c4, c5) VALUES ('b1', 'b2', 'b3', 'b4', 'b5');
insert into test03(c1, c2, c3, c4, c5) VALUES ('c1', 'c2', 'c3', 'c4', 'c5');
insert into test03(c1, c2, c3, c4, c5) VALUES ('d1', 'd2', 'd3', 'd4', 'd5');
insert into test03(c1, c2, c3, c4, c5) VALUES ('e1', 'e2', 'e3', 'e4', 'e5');

select * from test03;

# 建立索引
alter table test03 add index idx_create_c1234(c1, c2, c3, c4);
show index from test03;

# 问题 : 我们创建了复合索引 idx_test_c1234, 根据以下 sql 分析下索引使用情况

# type = ref key_len = 31 ref = const
explain select * from test03 where c1 = 'a1';

# type = ref key_len = 62 ref = const, const
explain select * from test03 where c1 = 'a1' and c2 = 'a2';

# type = ref key_len = 93 ref = const, const, const
explain select * from test03 where c1 = 'a1' and c2 = 'a2' and c3 = 'a3';

# type = ref key_len = 124 ref = const, const, const, const
explain select * from test03 where c1 = 'a1' and c2 = 'a2' and c3 = 'a3' and c4 = 'a4';


# type = ref key_len = 124 ref = const, const, const, const
explain select * from test03 where c1 = 'a1' and c2 = 'a2' and c3 = 'a3' and c4 = 'a4';

# 1.
# type = ref key_len = 124 ref = const, const, const, const
explain select * from test03 where c1 = 'a1' and c2 = 'a2' and c4 = 'a4' and c3 = 'a3';

# 2.
# type = ref key_len = 124 ref = const, const, const, const
explain select * from test03 where c4 = 'a4' and c3 = 'a3' and c2 = 'a2' and c1 = 'a1';

# 3.
# type = range key_len = 93 ref = null
explain select * from test03 where c1 = 'a1' and c2 = 'a2' and c3 > 'a3' and c4 = 'a4';

# 4.
# type = range key_len = 124 ref = null
explain select * from test03 where c1 = 'a1' and c2 = 'a2' and c4 > 'a4' and c3 = 'a3';

# 5.
# type = ref key_len = 62 ref = const, const filtered = 20(c3 作用在于排序, 而非查找, 也是用到了的)
explain select * from test03 where c1 = 'a1' and c2 = 'a2' and c4 = 'a4' order by c3;

# 6.
# type = ref key_len = 62 ref = const, const filtered = 100
explain select * from test03 where c1 = 'a1' and c2 = 'a2' order by c3;

# 7.
# type = ref key_len = 62 ref = const, const filtered = 100, Extra : Using filesort **
explain select * from test03 where c1 = 'a1' and c2 = 'a2' order by c4;

# type = ref key_len = 62 ref = const, const filtered = 100
explain select * from test03 where c1 = 'a1' and c2 = 'a2' order by c3, c4;


# 8
# 8.1
# type = ref key_len = 31 ref = const Extra : Using where (c2, c3 用于排序)
explain select * from test03 where c1 = 'a1' and c5 = 'a5' order by c2, c3;

# 8.2
# type = ref key_len = 31 ref = const Extra : Using filesort (c2, c3 颠倒了)
explain select * from test03 where c1 = 'a1' and c5 = 'a5' order by c3, c2;

# 9
# type = ref key_len = 62 ref = const const Extra : Using index condition
explain select * from test03 where c1 = 'a1' and c2 = 'a2' order by c2, c3;

# 10
# type = ref key_len = 62 ref = const, const Extra : Using where
explain select * from test03 where c1 = 'a1' and c2 = 'a2' and c5 = 'a5' order by c2, c3;

# type = ref key_len = 62 ref = const const Extra : Using where (c2 已经是一个常量了, 排序无用)
explain select * from test03 where c1 = 'a1' and c2 = 'a2' and c5 = 'a5' order by c3, c2;

# type = ref key_len = 31 ref = const Extra : Using filesort (c2, c3 颠倒了, 且 c2 非常量)
explain select * from test03 where c1 = 'a1' and c5 = 'a5' order by c3, c2;

# 11
# type = ref key_len = 31 ref = const Extra : Using where
explain select count(*) from test03 where c1 = 'a1' and c4 = 'a4' group by c2, c3;

# 12
# type = ref key_len = 31 ref = const Extra : Using temporary; Using filesort (GG)
explain select count(*) from test03 where c1 = 'a1' and c4 = 'a4' group by c3, c2;

/*
 总结 :
    定值、范围还是排序, 一般 order by 是给个范围
    group by 基本上都需要进行排序, 会有临时表产生
 一般性建议 :
    对于单键索引, 尽量选择针对当前 query 过滤性更好的索引
    在选择组合索引的时候, 当前 query 中过滤性最好的字段在索引顺序中, 位置越靠前越好(最佳左前缀法则)
    在选择组合索引的时候, 尽量选择可以能包含当前 query 中的 where 子句中更多字段的所有
    尽可能通过分析统计信息和调整 query 的写法来达到选择合适索引的目的
 */
2
3
4
5
6
7
8
9
10
11
12
13
14
15
16
17
18
19
20
21
22
23
24
25
26
27
28
29
30
31
32
33
34
35
36
37
38
39
40
41
42
43
44
45
46
47
48
49
50
51
52
53
54
55
56
57
58
59
60
61
62
63
64
65
66
67
68
69
70
71
72
73
74
75
76
77
78
79
80
81
82
83
84
85
86
87
88
89
90
91
92
93
94
95
96
97
98
99
100
101
102
103
104
105
106
107
108
109
110
111
112
113
114
# 索引失效
概念
索引失效大致分为以下几种 :
- 全值匹配我最爱
- 最佳左前缀法则 : 如果索引了多例, 要遵循最左前缀发展, 指的是从索引的最左前列开始并且 不跳过索引中的列
- 不在索引上做任何操作 (计算, 函数, (自动 or 手动) 类型转换), 会导致索引失效而转向全表扫描
- 存储引擎不能使用索引中范围条件右边的列
- 尽量使用覆盖索引 (只访问索引的查询 (索引列和查询列一致)), 减少 select
- mysql 在使用不等于 (!= 或者 <>) 的时候无法使用索引会导致全表扫描
- is null, is not null 也无法使用索引
- like 以通配符开头 ('$abc...') mysql 索引会失效变成全表扫描操作
- 字符串不加单引号 ('') 索引失效
- 少用 or, 用它连接是索引会失效
代码
create table staffs (
    id INT primary key auto_increment,
    name VARBINARY(24) not null default '' COMMENT '姓名',
    age INT not null default 0 COMMENT '年龄',
    pos VARBINARY(20) not null default '' COMMENT '职位',
    add_time TIMESTAMP not null default CURRENT_TIMESTAMP() COMMENT '入职时间'
) CHARSET utf8 COMMENT '员工记录表';

insert into staffs (name, age, pos, add_time) VALUES ('z3', 22, 'manager', NOW());
insert into staffs (name, age, pos, add_time) VALUES ('l4', 23, 'dev', NOW());
insert into staffs (name, age, pos, add_time) VALUES ('w5', 23, 'dev', NOW());
insert into staffs (name, age, pos, add_time) VALUES ('2000', 23, 'dev', NOW());

truncate table staffs;

select * from staffs;

alter table staffs add index idx_staff_nameAgePos(name, age, pos);

show index from staffs;

# 索引失效案例
/*
 1. 全值匹配我最爱
 2. 最佳左前缀法则 : 如果索引了多例, 要遵循最左前缀发展, 指的是从索引的最左前列开始并且 不跳过索引中的列
 3. 不在索引上做任何操作 (计算, 函数, (自动 or 手动) 类型转换), 会导致索引失效而转向全表扫描
 4. 存储引擎不能使用索引中范围条件右边的列
 5. 尽量使用覆盖索引 (只访问索引的查询 (索引列和查询列一致)), 减少 select
 6. mysql 在使用不等于 (!= 或者 <>) 的时候无法使用索引会导致全表扫描
 7. is null, is not null 也无法使用索引
 8. like 以通配符开头 ('$abc...') mysql 索引会失效变成全表扫描操作 问题 : 解决 like '%字符串%' 索引不被使用的方法 ?
 9. 字符串不加单引号 ('') 索引失效
 10. 少用 or, 用它连接是索引会失效
 */

# 1. 全值匹配我最爱
# type = ref, key = idx_staff_nameAgePos, key_len = 26, ref = const, rows = 1
explain select * from staffs where name = 'l4';

# type = ref, key = idx_staff_nameAgePos, key_len = 30, ref = const,const rows = 1
explain select * from staffs where name = 'l5' and age = 23;

# type = ref, key = idx_staff_nameAgePos, key_len = 52, ref = const,const,const rows = 1
explain select * from staffs where name = 'l4' and age = 23 and pos = 'dev';

# 2. 最佳左前缀法则
# type = ALL, key = NULL, ref = NULL, rows = 3
explain select * from staffs where age = 23 and pos = 'dev';

# type = ALL, key = NULL, ref = NULL, rows = 3
explain select * from staffs where pos = 'dev';

# type = ref, key = idx_staff_nameAgePos, key_len = 26, ref = const, rows = 1
explain select * from staffs where name = 'l4';


# type = ref, key = idx_staff_nameAgePos, key_len = 26, ref = const, rows = 1
explain select * from staffs where name = 'l4' and pos = 'dev';

# 3. 不在索引上做任何操作 (计算, 函数, (自动 or 手动) 类型转换), 会导致索引失效而转向全表扫描
# type = ref
explain select * from staffs where name = 'l4';

# type = ALL
explain select * from staffs where length(name) = 2;

# type = ALL
explain select * from staffs where left(name, 2) = 'l4';

# type = ALL (类型转换)
explain select * from staffs where name = 2000;

# 4. 存储引擎不能使用索引中范围条件右边的列
# type = ref
explain select * from staffs where  name = 'z3';

# type = ref
explain select * from staffs where name = 'z3' and age = 22 and pos = 'manager';

# type = range (age 用到了, 但是 pos 没用到)
explain select * from staffs where name = 'z3' and age > 21 and pos = 'manager';

# 5. 尽量使用覆盖索引
# Extra : Using index condition
explain select * from staffs where name = 'z3' and age = 22 and pos = 'manager';

# Extra : Using where; Using index
explain select name, age, pos from staffs where name = 'z3' and age = 22 and pos = 'manager';

# key_len = 52
explain select name, age, pos from staffs where name = 'z3' and age = 22 and pos = 'manager';

# key_len = 30
explain select name, age, pos from staffs where name = 'z3' and age > 21 and pos = 'manager';

# key_len = 30 && Extra : Using where; Using index
explain select name, age from staffs where name = 'z3' and age > 21 and pos = 'manager';

# 6. mysql 在使用不等于 (!= 或者 <>) 的时候无法使用索引会导致全表扫描
# type = ref
explain select * from staffs where name = 'l4';

# type = ALL
explain select * from staffs where name != 'l4';

# type = ALL
explain select * from staffs where name <> 'l4';


# 7. is null, is not null 也无法使用索引
# type = NULL
explain select * from staffs where name is null;

# type = ALL
explain select * from staffs where name is not null;


# 8. like 以通配符开头 ('$abc...') mysql 索引会失效变成全表扫描操作
# type = ALL
explain select * from staffs where name like '%l4%';

# type = ALL
explain select * from staffs where name like '%l4';

# type = range
explain select * from staffs where name like 'l4%';


# 9. 字符串不加单引号 ('') 索引失效 (类型转换)
# type = ref
explain select * from staffs where name = '2000';

# type = ALL
explain select * from staffs where name = 2000;


# 10. 少用 or, 用它连接是索引会失效
# type = ALL
explain select * from staffs where name = 'l4' or name = 'z3';

/*
 总结 :
    like KK%相当于=常量     %KK和%KK% 相当于范围
    优化总结口诀 :
        全值匹配我最爱, 最左前缀要遵守;
        带头大哥不能死, 中间兄弟不能断;
        索引列上少计算, 范围之后全失效;
        LIKE百分写最右, 覆盖索引不写星;
        不等空值还有or, 索引失效要少用;
        VAR引号不可丢 ,SQL高级也不难!

 */
2
3
4
5
6
7
8
9
10
11
12
13
14
15
16
17
18
19
20
21
22
23
24
25
26
27
28
29
30
31
32
33
34
35
36
37
38
39
40
41
42
43
44
45
46
47
48
49
50
51
52
53
54
55
56
57
58
59
60
61
62
63
64
65
66
67
68
69
70
71
72
73
74
75
76
77
78
79
80
81
82
83
84
85
86
87
88
89
90
91
92
93
94
95
96
97
98
99
100
101
102
103
104
105
106
107
108
109
110
111
112
113
114
115
116
117
118
119
120
121
122
123
124
125
126
127
128
129
130
131
132
133
134
135
136
137
138
139
140
141
142
143
144
145
146
147
148
149
150
151
152
153
# 总结
假设 index(a, b, c)
| where 语句 | 索引是否被引用 |
|---|---|
| where a = 3 | y, 使用到 a(ref) |
| where a = 3 and b = 5 | y, 使用到 a, b(ref) |
| where a = 3 and b = 5 and c = 4 | y, 使用到 a, b, c(ref) |
| where b = 3 或者 where b = 3 and c = 4 或者 where c = 4 | n(ref) |
| where a = 3 and c = 5 | 使用到 a, 但是 c 不可以, b 中间断了(ref) |
| where a = 3 and b > 4 and c = 5 | 使用到 , b, c 不能使用在范围之后, b 断了(rang) |
| where a = 3 and b like 'kk%' and c = 4 | y, a 能用, b 能用, c 能用(range) |
| where a = 3 and b like '%kk' and c = 4 | y, a 能用, b 不能用, c 不能用(ref) |
| where a = 3 and b like '%kk%' and c = 4 | y, a 能用, b 不能用, c 不能用(ref) |
| where a = 3 and b like 'k%k%' and c = 4 | y, a 能用, b 能用, c 能用(range) |
总结 : like KK%相当于=常量 %KK和%KK% 相当于范围 优化总结口诀 : 全值匹配我最爱, 最左前缀要遵守; 带头大哥不能死, 中间兄弟不能断; 索引列上少计算, 范围之后全失效; LIKE百分写最右, 覆盖索引不写星; 不等空值还有or, 索引失效要少用; VAR 引号不可丢, SQL高级也不难!
# 解决like索引失效问题
# 问题 : 解决 like '%字符串%' 索引不被使用的方法 ?
/*
 1. 可以使用主键索引
 2. 使用覆盖索引, 查询字段必须是建立覆盖索引字段
 3. 当覆盖索引指向的字段是varchar(380)及380以上的字段时, 覆盖索引会失效
 */
create table tbl_user (
    id INT(11) not null auto_increment,
    name VARBINARY(20) default null,
    age INT(11) default null,
    email VARBINARY(30) default null,
    primary key (id)
) ENGINE = INNODB AUTO_INCREMENT = 1 DEFAULT CHARSET = utf8;

# drop table tbl_user

insert into tbl_user(name, age, email) VALUES ('1aa1', 21, 'b@163.com');
insert into tbl_user(name, age, email) VALUES ('2aa2', 222, 'a@163.com');
insert into tbl_user(name, age, email) VALUES ('3aa3', 265, 'c@163.com');
insert into tbl_user(name, age, email) VALUES ('4aa4', 21, 'd@163.com');
insert into tbl_user(name, age, email) VALUES ('5aa5', 23, 'f@163.com');


# 建立索引之前
# type = ALL, key = NULL
explain select name, age from tbl_user where name like '%aa%';

# type = ALL, key = NULL
explain select id from tbl_user where name like '%aa%';

# type = ALL, key = NULL
explain select name from tbl_user where name like '%aa%';

# type = ALL, key = NULL
explain select age from tbl_user where name like '%aa%';

# type = ALL, key = NULL
explain select id, name from tbl_user where name like '%aa%';

# type = ALL, key = NULL
explain select * from tbl_user where name like '%aa%';

# type = ALL, key = NULL
explain select id, name, age, email from tbl_user where name like '%aa%';


# 建立索引
alter table tbl_user add index idx_user_nameAge(name, age);
show index from tbl_user;

drop index idx_user_nameAge on tbl_user;

# type = index, key = idx_user_nameAge
explain select name, age from tbl_user where name like '%aa%';

# type = index, key = idx_user_nameAge
explain select id from tbl_user where name like '%aa%';

# type = index, key = idx_user_nameAge
explain select name from tbl_user where name like '%aa%';

# type = index, key = idx_user_nameAge
explain select age from tbl_user where name like '%aa%';

# type = index, key = idx_user_nameAge
explain select id, name from tbl_user where name like '%aa%';

# type = ALL, key = NULL
explain select * from tbl_user where name like '%aa%';

# type = ALL, key = NULL
explain select id, name, age, email from tbl_user where name like '%aa%';
2
3
4
5
6
7
8
9
10
11
12
13
14
15
16
17
18
19
20
21
22
23
24
25
26
27
28
29
30
31
32
33
34
35
36
37
38
39
40
41
42
43
44
45
46
47
48
49
50
51
52
53
54
55
56
57
58
59
60
61
62
63
64
65
66
67
68
69
70
71
72
73
# 索引优化总结
- 对于单键索引,尽量选择针对当前query过滤性更好的索引
- 在选择组合索引的时候,当前Query中过滤性最好的字段在索引字段顺序中,位置越靠前越好。
- 在选择组合索引的时候,尽量选择可以能包含当前query中的where子句中更多字段的索引
- 尽可能通过分析统计信息和调整query的写法来达到选择合适索引的目的
# 查询截取分析
# 查询优化
永远谨记 : 小表驱动大表

# exists
/*
 sql 分析
    1. 观察, 至少跑一天, 看看生产的慢 sql 情况
    2. 开启慢查询日志, 设置阙值, 比如超过 5 秒的就是慢 sql, 并将它抓取出来
    3. explain + 慢 sql 分析
    4. show profile
    5. 运维经理 or dba, 进行 sql 数据库服务器的参数调优
 总结 :
    1. 慢查询的开启并捕获
    2. explain + 慢查询分析
    3. show profile 查询 sql 在 MySQL 服务器里面的执行细节和声明周期情况
    4. sql 数据库服务器的参数调优


 数据库中, 优先选择选择上面的循环
 for (int i = 5; ...) {
    for (int j = 1000; ... (
    }
 }

 =============================

 for (int i = 1000; ...) {
    for (int j = 5; ... (
    }
 }
查询优化 :
    优化原则 : 小表驱动大表, 级小的数据集驱动大的数据集
    原理 : RBO
    select * from A where id in (select id from B)
    等价于
    for select id from B
    for select * from A where A.id = B.id;

    当 B 表的数据必须小于 A 表的数据集是, 用 in 优于 exists

    select * from A exists (select 1 from B where B.id = A.id)
    等价于
    for select * from A
    for select * from B where B.id = A.id

    当 A 表的数据集系小于 B 表的数据集是, 用 exists 优于 in
    注意 : A 表与 B 表的 id 字段应建立索引


    exists :
        语法 : select ... from table where exists (subQuery)
            该语法可以理解为 : 将主查询的数据, 放到子查询中做条件验证, 根据验证结果 (true/false) 来决定主查询的数据是否得以保留

        提示 :
            1. exists(subQuery) 只返回 true/false, 因此子查询中的 select * 也可以是 select 1 或者 select 'X', 官方的说法是
               实际执行的时候会忽略 select 清单, 因此没有区别
            2. exists 子查询的实际执行过程可能经过了优化而不是我们理解上的逐条对比, 如果担心效率问题, 可进行实际校验以确实是否有效率问题
            3. exists 子查询往往也可以用条件表达式, 其他子查询或者 join 代替, 何种最优需要具体问题具体分析
 */

# exists 案例
select * from tbl_emp e where e.deptId in (select id from tbl_dept d);

select * from tbl_emp e where exists (select 1 from tbl_dept d where e.deptId = d.id);
select * from tbl_emp e where exists (select 'X' from tbl_dept d where e.deptId = d.id);
2
3
4
5
6
7
8
9
10
11
12
13
14
15
16
17
18
19
20
21
22
23
24
25
26
27
28
29
30
31
32
33
34
35
36
37
38
39
40
41
42
43
44
45
46
47
48
49
50
51
52
53
54
55
56
57
58
59
60
61
62
# order by 优化
# order by 关键字优化
/*
 order by 子句, 尽量使用 index 方式进行排序, 避免使用 filesort 方式排序
 */

create table tblA (
    # id INT primary key not null auto_increment,
    age INT,
    birth TIMESTAMP not null
);

insert into tblA(age, birth) VALUES (22, NOW());
insert into tblA(age, birth) VALUES (23, NOW());
insert into tblA(age, birth) VALUES (24, NOW());

select * from tblA;

create index idx_A_ageBirth on tblA(age, birth);
show index from tblA;

# Extra : Using where; Using index
explain select * from tblA where age > 20 order by age;

# Extra : Using where; Using index
explain select * from tblA where age > 20 order by age, birth;

# Extra : Using where; Using index; Using filesort
explain select * from tblA where age > 20 order by birth;

# Extra : Using where; Using index; Using filesort
explain select * from tblA where age > 20 order by birth, age;

# Extra : Using index; Using filesort
explain select * from tblA order by birth;

# Extra : Using where; Using index; Using filesort
explain select * from tblA where birth > '2021-11-05 00:00:00' order by birth;

# Extra : Using where; Using index; Using filesort
explain select * from tblA where birth > '2021-11-05 00:00:00' order by age;

# Extra : Using where; Using index
explain select * from tblA where birth > '2021-11-05 00:00:00' order by age ASC, birth DESC;

/*
 MySQL 支持两种排序, filesort 和 index,
 index 效率高, 它指 MySQL 扫描所有本身完成排序, filesort 方式效率较低

 order by 满足以下两种情况, 会使用 index 排序 : (最佳左前缀法则)
    1. order by 语句使用索引最左前列
    2. 使用 where 子句与 order by 子句条件列组合满足索引最左前列

 因此, 尽可能在索引列上完成排序操作, 遵照索引键的最佳左前缀


 如果不在索引列上, filesort 有两种算法 :
    1. 双路排序 :
        MySQL 4.1 之前使用的是双路排序, 字面意思是两次扫描磁盘, 最终得到数据
        从磁盘中取出排序字段, 在 buffer 中进行排序, 再从磁盘中取出其他字段

    2. 单路排序 :
        从磁盘读取查询需要的所有列, 按照 order by 列在 buffer 对它们进行排序, 然后扫描排序后的列表进行输出
        它的效率更快一些, 避免了第二次读取数据, 并且把随机IO变成顺序IO, 但是它会使用更多的空间, 因为它把每一行都保存在内存中了

    结论级引申出的问题 :
        1. 单路总体而言优于双路
        2. 使用单路有问题

    优化策略 :
        1. 增大 sort_buffer_size 参数的设置
        2. 增大 max_length_for_sort_data 参数的设置
        原因 : 如下

 */


 /*
  单路使用可能出现的问题 :
    在 sort_buffer 中, 方法 B 要比 方法 A 多占用很多空间, 因为方法 B 是把所有字段都取出, 所以有可能取出的数据的总大小超出了 sort_buffer
    的容量, 导致每次只能去 sort_buffer 容量大小的数据, 进行排序(新建 tmp 文件, 多路合并), 排完再取出 sort_buffer 容量大小的数据, 再一次
    进行排序, 从而多次 I/O
    本来想省一次 I/O 操作, 反而导致了大量了 I/O 操作, 反而得不偿失
  */

/*
 优化策略提高 sort_buffer_size 参数和 max_length_for_sort_data 参数的原因 :
    1. order by 时 select * 是一个大忌, 只 query 需要的字段, 这点儿非常重要, 在这里的影响是 :
        1. 当 query 的字段大小总和小于 max_length_for_sort_data 而且排序字段不是 TEXT | BLOB 类型时, 会用改进后的算法 -- 单路排序
           否则使用老算法 -- 多路排序
        2. 两种算法的数据都有可能超出 sort_buffer 的容量, 超出之后, 会创建 tmp 文件进行合并排序, 导致多次 I/O, 但是用单路排序算法的风险
           会更大一些, 所以要提高 sort_buffer_size
    2. 尝试提高 sort_buffer_size
        不管用哪种算法, 提高这个参数都会提高效率, 当然, 要根据系统的能力去提高, 因为这个参数是针对每个进程的
    3. 尝试提高 max_length_for_sort_data
        提高这个参数, 会增加用改进算法的概率, 但是如果设置的太大, 数据总容量超出 sort_buffer_size 的概率就会增大, 明显症状是高的磁盘 I/O
        活动和低的处理器使用率
 */
2
3
4
5
6
7
8
9
10
11
12
13
14
15
16
17
18
19
20
21
22
23
24
25
26
27
28
29
30
31
32
33
34
35
36
37
38
39
40
41
42
43
44
45
46
47
48
49
50
51
52
53
54
55
56
57
58
59
60
61
62
63
64
65
66
67
68
69
70
71
72
73
74
75
76
77
78
79
80
81
82
83
84
85
86
87
88
89
90
91
92
93
94
95
96
97
98
# order by 优化总结
key a_b_c(a, b, c)
order by 能使用索引最前缀 - order by a - order by a, b - order by a, b, c - order by a DESC, b DESC, c DESC
如果 where 使用索引的最左前缀定义为常量, 则 order by 能使用索引 - where a = const order by b, c - where a = const and b = const order by c - where a = const order by b, c - where a = const and b > const order by b, c
不能使用索引进行排序 - order by a ASC, b DESC, c DESC # 排序不一致 - where g = const order by b, c # 丢失 a 索引 - where a = const order by c # 丢失 b 索引 - where a = const order by a, d # d 不是索引的一部分 - where a in (...) order by b, c # 对于排序来说, 多个相等条件也是范围查询
# group by 优化
# group by 关键字优化

/*
 group by 优化总体和 order by 优化规则一致

 有以下几点需注意 :
    1. group by 实质是先排序后进行分组, 遵照索引建的最佳左前缀
    2. 当无法使用索引列时, 增大 max_length_for_sort_data 参数的设置 + 增大 sort_buffer_size 参数的设置
    3. where 高于 having, 能写在 where 限定的条件就不要去 having 限定了
 */
2
3
4
5
6
7
8
9
10
# 慢查询日志
# 慢查询日志

/*

 概念 :
    MySQL 的慢查询日志是 MySQL 提供的一种日志记录, 它用来记录在 MySQL 中响应时间超过阙值的语句,
    具体指运行时间超过 long_query_time 值的 sql 语句, 则会被记录到慢查询日志中

    具体指运行时间超过 long_query_time 值的 sql 语句, 则会被记录到慢查询日志中, long_query_time 的默认值是 10,
    意思是运行 10s 以上的语句

    由他来查看哪些 sql 超出了我们的最大忍耐时间值, 比如一条 sql 执行超过 5s, 我们就算慢 sql, 希望能收集超过 5s 的 sql,
    结合之前的 explain 进行全面分析

 如果要慢查询日志永久生效, 需要修改 my.cnf 文件
    在 [mysqld] 下配置以下参数, 然后重启服务器即可

    slow_query_log=1;
    slow_query_log_file=/var/lib/mysql/VM-4-8-centos-slow.log
    long_query_time=3;
    log_output=FILE

 开启慢查询日志后, 什么样的 sql 会被记录到慢查询日志中 ?
    这个是由参数 long_query_time 控制, 默认情况下为 10s, 可以通过命令行或者在 my.cnf 中进行修改
    MySQL 源码里是判断 大于 long_query_time, 而非大于等于

 慢查询日志在 /var/lib/mysql 目录下, 名为 xxx-slow.log


 日记分析工具 mysqldumpshow
    查看 mysqldumpshow 的帮助信息
        s : 是表示按何种方式排序
        c : 访问次数
        l : 锁定时间
        r : 返回记录
        t : 查询时间
        al : 平均锁定时间
        ar : 平均返回记录数
        at : 平均查询时间
        t : 即为返回前面多少条的数据
        g : 后边搭配一个正则匹配模式, 大小写不敏感的

    工作常用参考
        得到返回记录最多的 10 个 sql
        mysqldumpslow -s r -t 10 /var/lib/mysql/VM-4-8-centos-slow.log

        得到访问次数最多的 10 条 sql
        mysqldumpslow -s c -t 10 /var/lib/mysql/VM-4-8-centos-slow.log

        得到按照时间排序的前 10 条里面含有左连接的查询语句
        mysqldumpslow -s t -t 10 -g "left join" /var/lib/mysql/VM-4-8-centos-slow.log

        另外建议在使用这些命令时结合 | 和 more 使用, 否则有可能出现爆屏清理
        mysqldumpslow -s r -t 10 /var/lib/mysql/VM-4-8-centos-slow.log | more
 */

# 查看慢查询日志是否开启
show variables like '%slow_query_log%';

# 开启慢查询日志
set global slow_query_log = 1;

# 查看 long_query_time
show variables like '%long_query_time%';

# 修改 long_query_time 修改完之后需要重新连接或者新开一个会话, 才能刷新成功
set global long_query_time = 3;

# 睡 4s
select sleep(4);

# 查看当前数据库有多少条慢 sql 查询记录
show global status like '%Slow_queries%';
2
3
4
5
6
7
8
9
10
11
12
13
14
15
16
17
18
19
20
21
22
23
24
25
26
27
28
29
30
31
32
33
34
35
36
37
38
39
40
41
42
43
44
45
46
47
48
49
50
51
52
53
54
55
56
57
58
59
60
61
62
63
64
65
66
67
68
69
70
71
72
73
74
# 批量数据脚本
# 批量脚本数据

# 1. 建表 dept
create table dept (
    id INT unsigned primary key auto_increment,
    deptno MEDIUMINT unsigned not null default 0,
    dname VARBINARY(20) not null default '',
    loc VARBINARY(13) not null default ''
) ENGINE = INNODB DEFAULT CHARSET = GBK;

# 2. 建表 emp
create table emp (
    id INT unsigned primary key auto_increment,
    empno MEDIUMINT unsigned not null default 0 COMMENT '编号',
    ename VARBINARY(20) not null default '' COMMENT '名字',
    job VARBINARY(9) not null default '' COMMENT '工作',
    mgr MEDIUMINT unsigned not null default 0 COMMENT '上级编号',
    hiredate DATE not null COMMENT '入职时间',
    sal DECIMAL(7,2) not null COMMENT '薪水',
    comm DECIMAL(7, 2) not null COMMENT '红利',
    deptno MEDIUMINT unsigned not null default 0 COMMENT '部门编号'
) ENGINE = INNODB DEFAULT CHARSET = GBK;

show tables;


# 开启 log_bin_trust_function_creators
/*
 永久开启方法 : 在 my.cnf 中 [mysqld] 下面加上
    log_bin_trust_function_creators = 1
 */
show variables like '%log_bin_trust_function_creators%';

set global log_bin_trust_function_creators = 1;

# 创建函数, 保证每条数据都不同

# 创建 随机产生字符串的函数

drop function rand_string;

create function rand_string(n INT) returns VARBINARY(255)
begin

    declare chars_str VARBINARY(100) default 'abcdefghijklmnopqrstuvwxyzABCDEFGHIJKLMNOPQRSTUVWXYZ';
    declare return_str VARBINARY(255) default '';
    declare i INT default 0;

    while i < n do
        set return_str = CONCAT(return_str, SUBSTR(chars_str, FLOOR(1 + RAND() * 52), 1));
        set i = i + 1;
        end while;

    return return_str;

end;

select rand_string(255);

# 随机产生部门编号
drop function rand_num;

create function rand_num () returns INT(5)
begin

    declare i INT default 0;

    set i = FLOOR(100 + RAND() * 10);

    return i;
end;

select rand_num();

# 往 emp 中插入数据
create procedure inset_emp(IN start INT(10), IN max_run INT(10))
begin

    declare i INT default 0;

    set autocommit = 0;
    repeat
        set i = i + 1;

        insert into
            emp(empno, ename, job, mgr, hiredate, sal, comm, deptno)
        VALUES
            ((start + i), rand_string(6), 'SALESMAN', 0001, CURDATE(), 2000, 400, rand_num());

    until i = max_run
    end  repeat;

    commit;
end;

# 往 dept 中插入数据
create procedure inset_dept(IN start INT(10), IN max_run INT(10))
begin
    declare i INT default 0;

    set autocommit = 0;
    repeat
        set i = i + 1;

        insert into dept(deptno, dname, loc) VALUES ((start + i), rand_string(10), rand_string(8));

    until i = max_run
    end  repeat;

    commit;
end;

# 调用存储过程
call inset_dept(100, 10);

select * from dept;

call inset_emp(600002, 10000000);

explain select * from emp where ename like 'e%';
2
3
4
5
6
7
8
9
10
11
12
13
14
15
16
17
18
19
20
21
22
23
24
25
26
27
28
29
30
31
32
33
34
35
36
37
38
39
40
41
42
43
44
45
46
47
48
49
50
51
52
53
54
55
56
57
58
59
60
61
62
63
64
65
66
67
68
69
70
71
72
73
74
75
76
77
78
79
80
81
82
83
84
85
86
87
88
89
90
91
92
93
94
95
96
97
98
99
100
101
102
103
104
105
106
107
108
109
110
111
112
113
114
115
116
117
118
119
120
121
# show profiles
# show profile
/*
 注意 : 最好在 linux 系统上执行, 不会有其余 sql 混淆, 特别是 DataGrip

 简介 : 是 MySQL 提供可以用来分析当前会话中语句执行的资源消耗情况, 可以用于 sql 的调优测量
       默认情况下, 参数处于关闭状态, 并保存最近 15 此的运行结果

 使用步骤 :
    查看 show profile 状态
        show variables like '%profiling%';

    开启 show profile
        set profiling = on;

    运行一些 sql

    查看结果 :
        show profiles;

    诊断 sql :
        show profile cpu, block io for query Query_ID;

 开发中需要注意的结论 : 有以下四个, 都急需优化
    converting HEAP to MyISAM : 查询结果太大, 内存都不够用了往磁盘上搬了
    Creating tmp table : 创建临时表, 拷贝数据到临时表, 用完再删除
    Copying to tmp table on disk : 把内存中临时表复制到磁盘, 危险 !!!
    locked

 */

# 查看
show variables like '%profiling%';

# 开启
set profiling = on;

# 预热
select * from tbl_emp e join tbl_dept d on e.deptId = d.id;

select * from tbl_emp e left join tbl_dept d on e.deptId = d.id;

select * from emp group by id%10 limit 150000;

select * from emp group by id%20 order by 5;

# 如果报错, 执行这条 sql
SET sql_mode ='STRICT_TRANS_TABLES,NO_ZERO_IN_DATE,NO_ZERO_DATE,ERROR_FOR_DIVISION_BY_ZERO,NO_ENGINE_SUBSTITUTION';


# 查看结果
show profiles;

# 诊断 sql, 可以查看执行这条 sql 的全部过程
show profile cpu, block io for query 9;

/*
 show profile 参数备注 :
    | all                   -- 显示所有的开销信息
    | block io              -- 显示块 IO 相关的开销信息
    | context switches      -- 上下文切换相关的开销信息
    | cpu                   -- 显示 CPU 相关的开销信息
    | ipc                   -- 显示发送和接收相关的开销信息
    | memory                -- 显示内存相关的开销信息
    | page faults           -- 显示页面错误相关的开销信息
    | source                -- 显示和 Source_function, Source_file, Source_line 相关的开销信息
    | swaps                 -- 显示交换次数相关的开销信息
 */

# 全局日志查询

/*
 永远不要在生成环境中开启这个功能


 */
# 编码启用
set global general_log = 1;

set global log_output = 'TABLE';

select * from dept;

select * from mysql.general_log;
2
3
4
5
6
7
8
9
10
11
12
13
14
15
16
17
18
19
20
21
22
23
24
25
26
27
28
29
30
31
32
33
34
35
36
37
38
39
40
41
42
43
44
45
46
47
48
49
50
51
52
53
54
55
56
57
58
59
60
61
62
63
64
65
66
67
68
69
70
71
72
73
74
75
76
77
78
79
80
81
82
83
84